Monday, December 30, 2013

Christmas 2013 Recap

It has been super busy around here transitioning into my new job and so many celebrations going on for Christmas and New Years... but I wanted to share some my Christmas decorations!


I wanted to start by going back to our Christmas tree in 2011. It was the first year we were married, so we got a small tree and it was the perfect size to fit all our small collection of ornaments and great for the small apartment we lived in. That year our family and friends gifted us with many ornaments to fill our tree.


The next year in 2012, we were in our home, so we wanted a big tree. This is when our ornament and decor collection started growing exponentially when my grandmother, godmother, and Mr. Engineer's aunt purged their collection and passed it along to us. 


This year we decided to put the tree in front of our large window in our dining room. We have quite a collection of ornaments already and also this year, and my mother's godmother gave me a lot of her decorations. Mr. Engineer also inherited some his MiMi's Christmas decorations.


  I just love how the tree glows through the window at night!


Our mantle has all our stockings hung and a few vintage figurines and garland.


Our entryway is festive with the paper snowflakes that I talked about here.


Here is a closer look at our entryway table. I especially love the mistletoe crystal!


You can also see our Christmas spirit outside our door with the yarn wreath I made last year!


 I Love how our tree is trimmed with all our special ornaments passed down from our family members and friends. We spent the holiday celebrating with our family and I hope everyone's Christmas was filled with lots of joy like ours was!


Saturday, December 14, 2013

Ornament Exchange

One Artsy Mama recently hosted an ornament exchange. I immediately signed up and on the application there was an area to specify certain colors or styles we would prefer. I choose every option: any color, and traditional, religious, glittery, vintage, colorful, and natural. I found out my exchange partner is from Sacramento, CA. and she also choose every option. This made my job a little harder to try to encompass all those themes. I also wanted to give her a taste of the Louisiana life. In my opinion the South is centered around two things: food and religion. So I decided to send two ornaments one which defined each of those cultural topics.
I decided to make the ornament which represents food. Of course I choose Tabasco as the center of that ornament. The small town I am from is only a few minutes away from Avery Island where Tabasco was invented and still being produced today and my mother works for the McIlhenny Co. that make the hot sauce. But I needed a background. An oyster shell was perfect touch of natural element the creation needed. Although it needed a little sparkle, so I glittered the back of the shell to smooth the imperfections. I drilled a hole and added a green ribbon so it could be easily hung on the tree.

For the other ornament, I choose a vintage religious ornament from my own collection. It is a pretty cross. This ornament was originally handed down to me by my godmother and was a set of two. My tree is getting crowded and so I have been trying to trim down my ornament collection by getting rid of any that I have a pair of. This ornament exchange was perfect for that extra ornament to get a new life!

I packed both of them up in a box with a note, sent them off and then patiently waited to see what I would receive in return. A few days later a box came in from California and I excidely opened it. It contained an ornament, some paper snow flakes, and a note.

The beautiful nativity scene ornament is so pretty! Actually I looked at my tree and realized I had many different religious ornaments, but no nativity scenes.


  So that ornament was the perfect addition to our tree!

I also found some hand cut snow flakes. They were cut out of various paper. The note explained that this was a tradition in their family to make these every year. How fun!

I excidely strung them together and hung them on my entryway wall. Everytime I look in that direction I smile because of the festive colors.

Thanks One Artsy Mama, this was such a fun holiday gift exchange! And thanks to my ornament exchange partner for the lovely Christmas decorations!

Friday, December 6, 2013

Bookcase Revamp

In my office, I had two small bookshelves that are from my childhood room. When we moved into our house I put a coat of white paint and overloaded them with our book collection and called it finished. Over the last two years, more stacks of books and boxes have been placed on top and next to them waiting for the day that I upgrade to bigger bookcases.


It was such a mess!
I am finally making that upgrade! Although I had been eyeing the large Ikea Expedit Shelving Unit and the medium Ikea Expedit Shelving Unit for a while now, it is not in our budget to spend almost $300 on both of them. But even without my ideal bookcases, my bookcase dreams are becoming a reality


Two free bookcases my Mama handed down to me was a major score! While it is not exactly the look I want, it will definitely function by getting all the stuff overflowing from the existing bookshelves off the floor. I decided to revamp them because I wasn't digging the wood laminate look. I have panted pieces before (the current bookshelves, a side table, and a headboard), but this would be my biggest project so far. 


 First, Mr. Engineer sanded all the surfaces with a hand sander.


We use 220 grit sand paper. Just to remove all imperfections and gently rough up the surface.


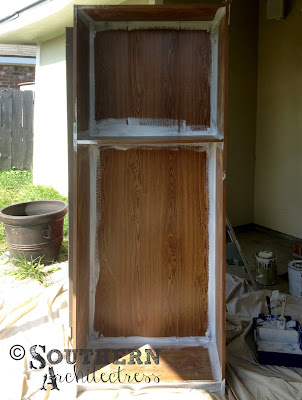
The next step was to prime and paint the wood laminate. I used primer and paint. I picked a white paint to match the moulding in our house. I just brought a paint chip to Lowes and they matched the color.


First I cut in all the corners and hard to reach areas with a small brush.


Then I used a roller to paint all the surfaces with a first coat of a primer.


Then I painted a second coat of primer to get better coverage.


While the primer was drying, I started the role process over on the shelves by sanding...


Then priming…


And finally painting them.


Then, took the existing bookshelves and books out of the office to make room for the new bookcases. Here is the blank slate room.


Finally, I painted all the surfaces of the main bookcase with white paint and brought the new bookcases into the office.


My next step was to line the back of the bookcases with fabric. (This idea is all over pinterest)


So I cut some chip board to size that would fit. 


I used some scissors to cut out the fabric and some spray adhesive to mount the fabric onto the pre cut chip board pieces.


I then mounted those fabric boards in the back of the bookcase using spray adhesive. 


I think the result brought life back into these old bookcases.


I then reassembled the shelves into the bookcase which will further secure the fabric boards in.


We wanted to make sure the bookcases were was extra sturdy, so we secured the top of the bookcases with an anchor angle.


 I have plenty of room for more books and new items now! I thought about maybe adding some dividers to get the look of the Ikea Expedit bookcases, but for now I am looking for a few bookends to get the job done. Although, I still have my eye on the two Ikea Expedit bookcases, for now my reading nook is a reality with the free bookcases that I revamped! I still have put back the books and items and stylizing it, which is the fun part!


And don't worry, I'm not getting rid of the previous bookshelves, I have another project in mind for them!


Linked up to Blissful and Domestic

Linked up to The Turquoise Home

Linked up to East Coast Creative

Linked up to Not Just a Housewife

Saturday, November 23, 2013

When Mr. Engineer is away...

... the Architectress will play.

A couple weekends ago Mr. Engineer went to the fishing camp and I did a little décor update to our guest bathroom. I thought some stripes on an accent wall and hanging some artwork would brighten up this small space.


It's a little hard to take photos of the whole wall at once… this is the before photo. I still love the Cincinnatian Hotel  Hannaford Valspar paint color we currently have on the bathroom walls, but I wanted to introduce a new color and pattern.


First I patched a few holes and imperfections in the wall with some spackle. When it dried I lightly sanded it. And then, I measured and taped off the stripes with some frog tape. 


This was the the first time I actually painted a wall:.. Even if it was just some small stripes on a tiny wall. I picked a white, that would match my moulding and base boards. I just brought a chip from my moulding and had them match the color at Lowes. I used a brush first to get into the corner. Then I applied the main coat with a roller. 


I only let the paint dry for about ten minutes then I peeled off the frog tape. I got super crisp lines.


I think it came out pretty good!


I added some artwork to complete the look.


I was recently given a little piece of art that was done by my father. This artwork is probably older than I am. It has been in my parent's master bathroom for as long as I remember. Currently my parents are redoing their bathroom and then adding on a new bathroom / closet suite so I inherited this quirky piece of folk art.


I was just going  to hang it inside the bathroom, but I didn't feel there was a good place to hang it...


...and then I found the perfect place to hang it is on our guest bathroom door. It also makes it easier for our guests to find the restroom.


 Linked up to Not Just a Housewife 


Monday, November 18, 2013

Architects' Glasses


Glasses are a major fashion statement within the profession. Chuncky black glasses are the typical choice for architects.


I just got my new glasses! Having the last pair for six years and it was definitely time for a change.


They are db4k Europa International Old School in black and crystal.
and yes.. they are children's glasses, because my face is so small I have to buy kid's size.


My new glasses also come at a time of transition with a new job opportunity. Today I started working at a new firm.