Monday, June 30, 2014

Lace Frame Accessory Holder

I love to use accessories for my hair because I hate it in my face, so you will usually find me with a headband or clip in my hair. I was using a shelf divider and a couple of shoe boxes to currently house these items. The organization of these accessories has become unruly in my closet. 


It is so messy and makes finding anything a chore. I needed a new solution, so I came up with a plan...


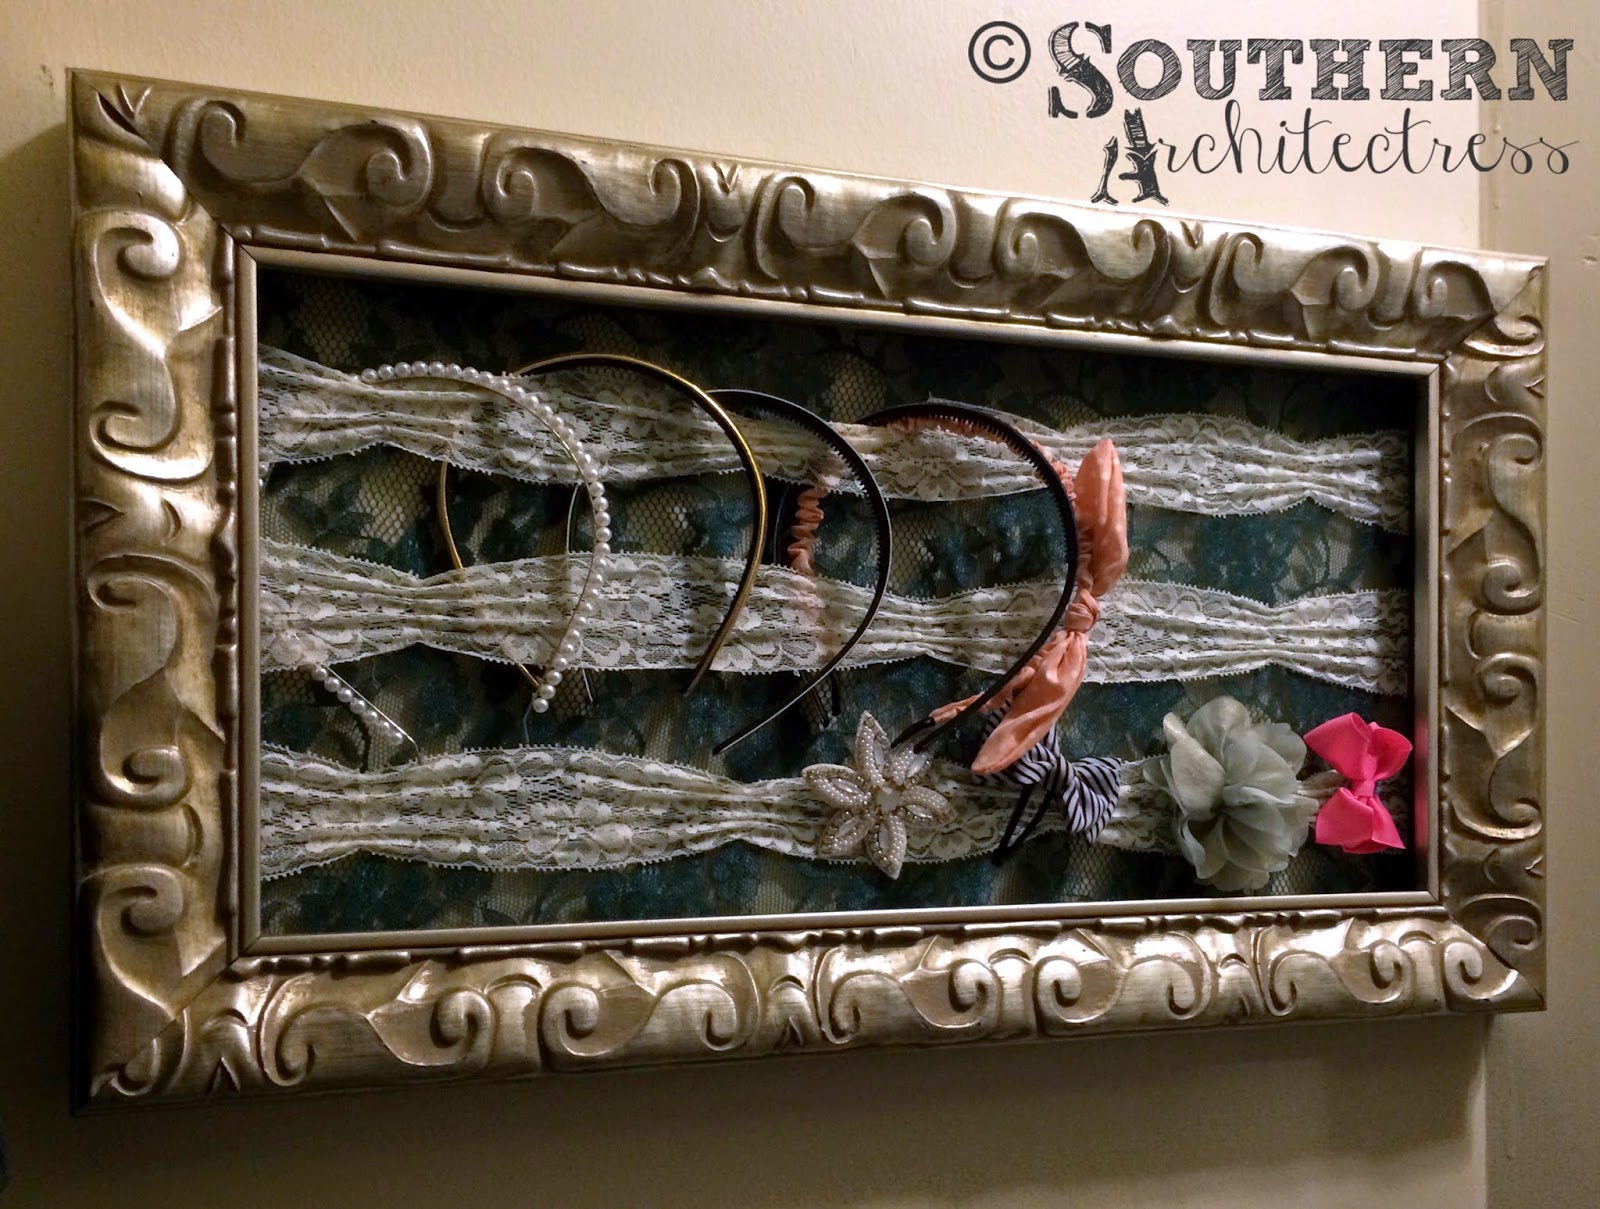
 ...a Lace Frame Accessory Holder. I was inspired by this. This allows me to easily see everything and to have a pretty display that I can choose from.


 I started with this open frame that was on sale at Hobby Lobby.


Supplies for this project:


- open frame
- staple gun and staples
- various lace (I used a yard of emerald lace I already had and bought some stretchy ivory lace ribbon)
- scissors
- needle and thread


 First I cut three pieces of the ivory lace ribbon.


Then I stapled the first piece to the back of the frame.


 Then I stapled the other two pieces.


 Here you can see the detail of the double row staples, so I could make sure it wouldn't break when that piece was streached.


 Next, I cut down a piece of the emerald lace.


Then, I attached a lace panel to the back with more nail gun action.


After I stapled all four sides, I trimmed off the excess.


Here you can see the detail of the staples on the back.


I wanted to make the three lace ribbon on the front more secure, so I hand sewed areas so that the lace ribbon could stay in place and not sag due to the weight of the items I place on it.


I stitched the first ivory lace ribbon to the emerald lace panel.


Then I stitched the other two ribbon.


Now the fun part was going through my collection and picking a spot for each accessory.  It really also allowed me to clean out stuff that I don't need anymore.


I added hangers to the back and mounted it on the wall in my closet.


It fits perfectly.


Voila! All my pretty hair things displayed!


Linked up to I Heart Organizing

Linked up to The Turquoise Home

Linked up to Not Just A Housewife

Sunday, June 15, 2014

Architectural Charcoal Rendering - Mount Carmel Academy

I was commissioned by my almer mater for some artwork of Mt. Carmel Academy for an auction. I was super excited at the chance to give back to my high school.

 Here are a couple photos of the building:

Photograph by scrambler390


 This is Mount Carmel Academy located on the corner of Duperior Avenue and Front Street in New Iberia, Louisiana. It is a beautiful building sited on the Bayou Tech. I was familiar with the history, but I learned some new thing about it's past when I did some research. It was constructed in 1850 as a residence for Doctor Henry Duperier. In 1872 it was sold to the Sisters of Mount Carmel and became a Catholic boarding school. The school was closed in 1988 when it joined with St. Peter's College to become Catholic High School of New Iberia, where I went to elementary and high school. Today it is the Place Eugenie office building owned by the Schellestede family.

After getting a feel for the building's history I got started on the rendering:


I choose 17" x 14" 80lb drawing paper.

 I started by taping off the area I want to work within. I used the dimension of 11" x 14" which is a typical size that can be easily matted and framed.


 Next I used vine charcoal and a ruler to do a basic perspective. I choose the view looking directly at the front facade.


 Then, I added more detail with the vine charcoal.


 Next, I picked up some black conte' and started retracing lines and adding more detail.


 Then, I wanted to add some color to give more life to the building. So, I picked up some brown conte' and started adding texture to the roof, shutters, and lentils.


 Next, I used white conte and more black conte to give some more contrast and add texture.


 Finally, I added in the final touches of the vegetation, oaks, sky and grass.

 My favorite part is peeling back the tape to reveal the crisp border line.  I love the way it turned out!


Here you can see more detail and the title of the artwork above my signature.


Linked up to Not Just A Housewife

Linked up to The Turquoise Home


Saturday, June 7, 2014

DIY Cake Plate

I have been on the hunt for the perfect cake plate, but they are either too plain or too expensive.


I got the idea of making my own cake plate.


The plan was set to action when I happened upon the perfect base for it at Hobby Lobby. It was a candle holder... Now all I needed was a plate.

I also found these found plates at Hobby Lobby and these and they were only $2.
  

 The only tools I needed to complete the project were a can of spray paint and a hot glue gun.
The bottom of the plate was black, so I sprayed it gold.
Then hot glued the candle holder to the plate.
Voila! My own gold and green cake plate.
It looks even better with a cake on it!
It even looks great with a cake dome.


Linked up to Not Just a Housewife

Linked up to The Turquoise Home

Linked up to It's Always Ruetten